
I have a limited number of IPv4 addresses available to me on my servers. So I am really frugal with how I assign them.
Whenever possible, my preference is to use NAT off of the main Proxmox IP. However I struggled to get this setup while also using the built-in Proxmox firewall that comes in version 4.0. Having an enabled firewall is an absolute requirement for me.
In this article I have documented the final working solution.
First, the firewalls…
Datacenter Firewall – enabled
Node Firewall – enabled
NAT’d container firewall – DISABLED
NAT’d container interface firewall option – DISABLED
Furthermore, any ports I wanted to be forwarded to my container, I needed to create inbound allow rules at the Datacenter and node levels. Just keep that in mind and make sure you circle back around and create the rules for any port forward/DNAT rules you put in.
For example, I am going to destination NAT port 2222 to port 22 on my container. This will allow me SSH access to my container via my Proxmox Node’s public IP with port 2222. Therefore, on the NODE and DATACENTER firewall’s, I create an inbound allow TCP port 2222.
The rest is easy if you know IP tables… Which I really don’t, so I will spell it out here…
Configure Node Networking – Add a New Internal Interface
1. Open and SSH session to your Node.
2. edit your network configuration file (I use VIM).
Add a new bridge interface. In my case I will call it vmbr50 because that is probably available for you as well. Just append the following to the bottom of your interfaces file. Don’t close the interfaces file yet, we still have more to add after this.
iface vmbr50 inet static
address 10.50.50.254
netmask 255.255.255.0
bridge_ports none
bridge_stp off
bridge_fd 0
Enable IP Forwarding and Outbound NAT
Next add the following post-up command to ensure ip_forwarding is enabled for the system. Post-Up commands are run whenever the interface is brought up. This goes immediately under the section we just put in above. Keep your interfaces file open.
Next, we need to add a command that will add an outbound NAT rule with IPtables. This rule basically says, do network address translation on outbound traffic as long as it originates from IP’s in a particular range. Furthermore, we want the rule to go away if the interface is taken down. So we will also add a post-down command. Keep your interfaces file open.
post-down iptables -t nat -D POSTROUTING -s '10.50.50.0/24' -o vmbr0 -j MASQUERADE
Add Port Forwarding (aka DNAT) Rules
The last piece of configuring your interfaces file is adding in Destination NAT rules. I am a visual person so here is an approximation of what port forwarding looks like with NAT.
home PC —-> start SSH session on port 2222 —> ProxMox Node Public IP address (1.2.3.4) —> Node Forwards traffic to Internal IP address of container on Port 22.
In this manner, a bunch of systems can “share” the public interface of your ProxMox node. This is explained elsewhere on the internet in greater detail. Just Google NAT, port forwarding, etc… For this article I am assuming you understand all of this and just want to get it working with Proxmox 4.0 with an enabled firewall.
So the syntax for a port forward rule using IPtables with our new network connection looks something like this:
Following that form, adding and IPtables rule to forward port 2222 on the node’s public interface to 22 on our containers private IP (example 10.50.50.15) would look like this:
Finally, now that we understand the syntax for adding DNAT rules in IPtables, lets setup post-up and post-down directives to add/delete the rule for SSH when the vmbr50 interface comes up and goes down respectively.
post-down iptables -t nat -D PREROUTING -i vmbr0 -p tcp --dport 2222 -j DNAT --to 10.50.50.15:22
Here is what the vmbr50 section of your interfaces file should now look like:
iface vmbr50 inet static
address 10.50.50.254
netmask 255.255.255.0
bridge_ports none
bridge_stp off
bridge_fd 0
post-up echo 1 > /proc/sys/net/ipv4/ip_forward
post-up iptables -t nat -A POSTROUTING -s '10.50.50.0/24' -o vmbr0 -j MASQUERADE
post-down iptables -t nat -D POSTROUTING -s '10.50.50.0/24' -o vmbr0 -j MASQUERADE
post-up iptables -t nat -A PREROUTING -i vmbr0 -p tcp --dport 2222 -j DNAT --to 10.50.50.15:22
post-down iptables -t nat -D PREROUTING -i vmbr0 -p tcp --dport 2222 -j DNAT --to 10.50.50.15:22
If that is where you ended up, save and close it, then bounce the vmbr50 interface from the command line:
Check a Few things…
Ensure the interface is up by pinging the nodes new internal IP locally. From your node’s command line:
If you get a response, then your interface is up. Next you can check if you rules were inserted to the IPtables firewall when you brought the interface up:
The above command should return something like this:
target prot opt source destination
DNAT tcp -- anywhere anywhere tcp dpt:2222 to:10.50.50.15:22
Chain INPUT (policy ACCEPT)
target prot opt source destination
Chain OUTPUT (policy ACCEPT)
target prot opt source destination
Chain POSTROUTING (policy ACCEPT)
target prot opt source destination
MASQUERADE all -- 10.50.50.0/24 anywhere
In the “POSTROUTING” chain we see our outbound NAT rule for the entire subnet on vmbr50 and in the “PREROUTING” chain we see our DNAT rule to forward 2222 to 22 on our intern IP for inbound traffic. Excellent!
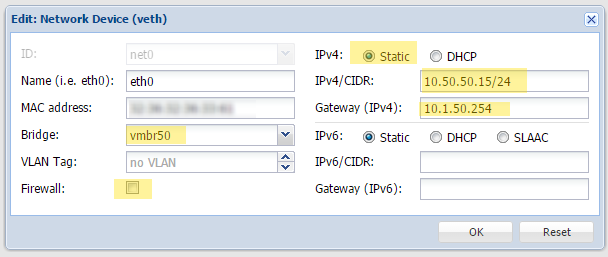
Container Network Configuration.
Configure your container’s interface to look like this:
 ‘
‘
A few notes:
1. The BRIDGE should be set to our new internal interface, vmbr50
2. ?The firewall should be disabled
3. The IPv4 is set to an internal IP on our new network. “/24” is CIDR notation for a subnet mask of 255.255.255.0 which is what we used when we setup vmbr50. I used 10.50.50.15 for the address as that is what I used in my DNAT rule above.
4. The gateway is set to the IP address on our vmbr50 interface.
Don’t forget to circle back around and add an Allow Inbound TCP 2222 Firewall rule on both your Node and Datacenter firewalls. The firewall on the container itself should be disabled and contain no rules.
That should do it!
Conclusion:
All of the above is rather poorly documented for Proxmox 4.0. Hopefully this is a help to others trying to accomplish NAT. You can add additional port forwarding rules to our /etc/network/interfaces file under the vmbr50 interface as needed using the post-up and post-down directives. Just follow the form given above. I am sincerely hopeful the Proxmox team integrates some routing and port forwarding configuration into the GUI in the near future but in the meantime I have gotten a good initial education in IPtables.
Hey, I followed your guide but it doesn’t seem to match what you set up.. I didnt have to explicitly allow the forwarded SSH port on the datacentre/node FW.
I’m on Proxmox v 4.1-1
I’ve enabled the FW on the datacentre and node. Input: DROP, Output: ACCEPT.
I have two VMs, 10.10.10.2 and 10.10.10.3
On the host I have eth0 as my public IP, 192.168.1.20 and vmbr0, 10.10.10.1 as the VMs gateway.
I’ve setup natting which looks good from the iptables & forwarded port 1022 to 22 on one of the VMs
Chain PREROUTING (policy ACCEPT)
target prot opt source destination
DNAT tcp — anywhere anywhere tcp dpt:1022 to:10.10.10.2:22
Chain INPUT (policy ACCEPT)
target prot opt source destination
Chain OUTPUT (policy ACCEPT)
target prot opt source destination
Chain POSTROUTING (policy ACCEPT)
target prot opt source destination
MASQUERADE all — 10.10.10.0/24 anywhere
At this point I can connect to 192.168.1.20:1022 from an IP on 192.168.1.0 network and it connects to the VM.
This doesn’t seem to make sense as I haven’t allowed access to port 1022 on the FW.
Any ideas why that would happen? do DNAT rules count as a “match” and therefore it doesn’t get dropped?
Hey Wully,
So what you are finding is that things are working and they shouldn’t be (necessarily). That might in fact be the case. Now that I think about it, I don’t think I actually tested without having the “allow” rules put in on my Node and Datacenter firewalls and I would bet you are correct that the DNAT rule = ALLOW all on its own. Based on my experience with other firewalls that is exactly correct actually. I need to update the article. I am still feeling my way through iptables…
It sort of doesn’t make sense as I would think natting to be seperate from the firewall, but in iptables there is a good chance the rules are being treated the same.
Like you, I found the documentation from proxmox to be lacking. I think from your guide though I’ve got my setup working how I want; Natted multiple VMs with the firewall blocking access at the top level.
Hey Nbeam, I’ve used this on my own server, trying to set some teamspeak instances up.The strange thing that is happening to me is when i restart vmbro50 with ifdown vmbr50 && ifup vmbr50, my instances wont work. The connection is not getting through to the hosts and I cant ping them anymore.
Any idea whats happening?