
This was going to be a long article but I decided to cut it short.
Use case:
You have a Remote Server – You need to securely access some sensitive service or another (let’s say a MySQL connection) and don’t want to open the port to up to the internet. What’s a person to do?
Answer:
Local Port Forwarding over SSH using Putty.
What does this do for me?
It allows me to assign a local port on my computer, say 3540, and any traffic I direct to that port (so traffic directed to 127.0.0.1:3540) will hop through a secure, encrypted tunnel and land on the port of my choosing on a remote server. Furthermore, my traffic will appear to the server as if it is coming from the server itself.
Why?
Here are few reasons:
1. You can encrypt normally unencrypted traffic, like HTTP, FTP, MySQL, etc. This makes it safe to send that traffic over the public internet without fear of snooping by the NSA, or the company you work for, or your ISP, etc. etc.
2. You can bypass local and remote firewalls.
3. You can access the server as if you were local. MySQL, for example, often is set by default to only allow database connections from clients that are local (i.e. your Apache web server running on the same machine). This makes it impossible to manage MySQL remotely… unless you use a tunnel at which point your traffic appears to be local.
How do I do it?
I am going to assume you know how to setup a normal SSH connection from Putty. If you want that connection to also tunnel traffic from a specific port on your machine to a specific port on your server, you would set it up like this.
1. Open up putty
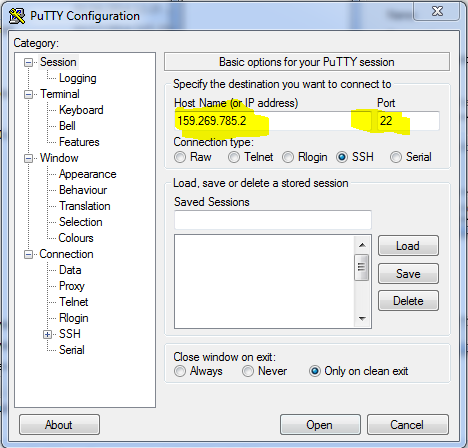
2. Configure your connection by punching in the public IP of your host and the port for SSH. Make sure connection type is set to “SSH”. Like so:
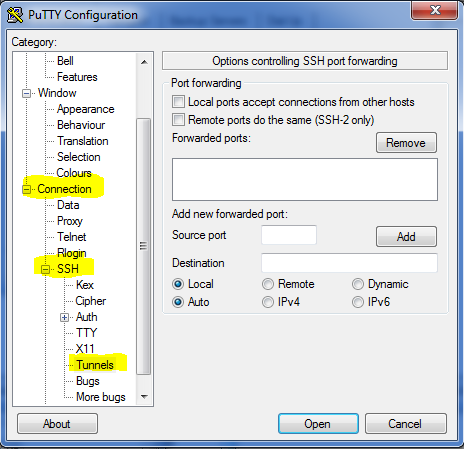
3. On the left hand side, expand “Connection” –> SSH –> then click on “Tunnels”
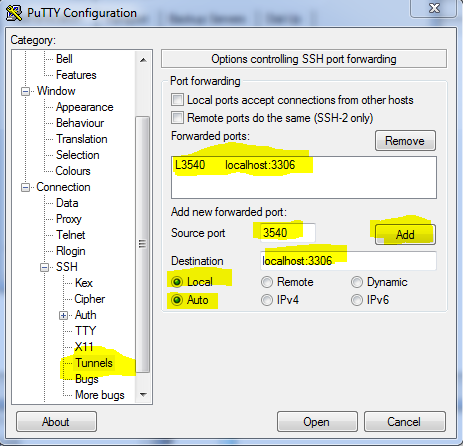
4. Under “source port” add a random unused port on your local client machine. Ex. 3540
5. Under “Destination” enter: localhost:the port you want to connect to on the server –> example: localhost:3306
(note: 3306 is the default mysql port)
6. Make sure “Local” and “Auto” are ticked for options. Then click the “Add” button. The final setup would look something like this after you click “add”
7. Optionally, if you plan on using this often, go back to the “Session” (on the left) config screen, type a name in the box right under “save sessions” and click “save” – that way you don’t have to configure everything everytime you want to create this tunnel.
8. Finally, click “open” at the bottom. An SSH terminal window should pop-up and you will need to authenticate to the server a the prompt. After that you will have a normal CLI terminal window open. You must keep this window open to keep the tunnel active.
9. Finally, make the connection from your client machine. Rather than connecting to the server’s IP, or the MySQL port, you will instead use: 127.0.0.1:3540 — i.e. you are connecting to your local loopback address on your machine, on the port you specified earlier.
10. Enjoy the magic. Your traffic is securely encrypted and you didn’t have to open that port up to the world.
Note you can also add/change tunnels after the connection is established. Comes in handy at times
Sorry for taking a few weeks to respond. Adding/changing tunnels after a connection has already been established sounds very cool indeed. Do you care to share a few steps on how to do so or point to an outside article/link? I took on a new position a few weeks back and work has been crazyville 🙂 hence no updates on the blog for almost a month.