
If you load Proxmox 4.0 from OVH or any of their affiliates you end up with a partition scheme that gives you one big logical volume for data that is formatted to EXT3.
That will work but it isn’t desirable. Starting with Proxmox 3.4, support for the ZFS filesystem was added. ZFS is more than just a file system though and as a result it adds in enhanced functionality. In this article I will be walking through how to transition from the OVH, KimSufi, SoYouStart default partition layout on an existing system running Proxmox to a layout with ZFS.
Advantages of ZFS for Proxmox:
1. Support for snapshots (using it allows you to take snapshots of containers the same way you can with virtual machines.)
2. Better data integrity – ZFS constantly checks stored data for errors and makes corrections
Those are the two things I cared about on my cheap KimSufi server.
If you have a higher-end box ZFS also allows you to use SSD drives for caching, allows you to setup RAID pretty much on the fly, etc.
However, with the default partition scheme provided by Kimsufi you can’t use ZFS without some tinkering. At a high-level…
1. We need to shrink the EXT3 data partition.
2. We need to then shrink the logical volume holding that data partition
3. We need to setup a new logical volume for ZFS
4. We need to create a ZFS pool on the new logical volume.
5. We need to setup a ZFS storage object in ProxMox
6. Deploy containers to the new storage target
It probably goes without saying, but you need to make sure your data is backed up if you are doing this on an existing installation…
Shrink the existing EXT3 data partition and Logical Volume:
1. Figure out the size of the current data partition and how much of it you are using. Login to your node and elevate to root.
Outputs something like this:
udev devtmpfs 10M 0 10M 0% /dev
tmpfs tmpfs 3.2G 8.8M 3.1G 1% /run
/dev/sda2 ext3 20G 1.5G 17G 8% /
tmpfs tmpfs 7.8G 43M 7.8G 1% /dev/shm
tmpfs tmpfs 5.0M 0 5.0M 0% /run/lock
tmpfs tmpfs 7.8G 0 7.8G 0% /sys/fs/cgroup
/dev/mapper/pve-data ext3 1.8T 154G 1.6T 9% /var/lib/vz
tmpfs tmpfs 100K 0 100K 0% /run/lxcfs/controllers
cgmfs tmpfs 100K 0 100K 0% /run/cgmanager/fs
/dev/fuse fuse 30M 16K 30M 1% /etc/pve
The important line is the one that starts with “/dev/mapper/pve-data” – From this we can see I have a partition that is 1.8 Terabytes in total size and I am using 154 Gigabytes. That last bit is the vital part. If you are already using this partition and you don’t want to destroy the data you must be careful NOT to shrink smaller than however much you are using.
Furthermore, you can figure out the Logical Volume path by doing this:
Which returns a lot of info, the line you are worried about is:
2. Shutdown your containers in Proxmox.
3. Unmount the partition
4. Do a file system check (this one can take a while, get some coffee…)
Which should return something like:
Pass 2: Checking directory structure
Pass 3: Checking directory connectivity
Pass 4: Checking reference counts
Pass 5: Checking group summary information
/var/lib/vz: 32/120487936 files (3.1% non-contiguous), 47871560/481945600 blocks
5. Resize the EXT3 filesystem (I opted to go to 200 Gigabytes)
6. Shrink the logical volume size that holds the partition (decided on 210 GB to play safe…).
This shoots a warning message that you need to respond with a “y” to.
7. Remount the resized partition.
8. Check it is mounted and the size looks correct with df -hT again… It outputs this (relevant bit shown):
/dev/mapper/pve-data 197G 154G 34G 83% /var/lib/vz
Next, lets setup a new logical volume for ZFS.
1. Get the name of the current volume group (should be “pve” but check anyway):
Returns (only relevant bit is shown):
VG Name pve
Alloc PE / Size 53760 / 210.00 GiB
Free PE / Size 417914 / 1.59 TiB
This also shows you how much space is allocated and how much is available. After all of our changes we now have a lot of free space in our volume group. I am going to create a new Logical Volume that will be 750 GB in size and it will be called ZFS and it will be in the “pve” volume groups.
While we are at it, I would like to create an additional volume called “BACKUP” I will store backup files on and it will be EXT4 format. I will get to it at the end of the article but I will create it right now, I will make it 750 GB also…
If I run vgdisplay again I can see the change…
VG Name pve
Alloc PE / Size 428760 / 1.64 TiB
Free PE / Size 42914 / 167.63 GiB
And also now I can run lvdisplay and I can see my new logical volumes…
LV Path /dev/pve/ZFS
LV Name ZFS
LV Size 732.42 GiB
--- Logical volume ---
LV Path /dev/pve/BACKUP
LV Name BACKUP
LV Size 732.42 GiB
Grand…
Now, we need to create a ZFS pool on the new logical volume.
The syntax for creating the pool is along the lines of:
zpool create –flags– ashift (the value of “12” should be correct for most setups, see last ref link below if you want to know more) nameOFpool LVpathWhereYouWantThePool
Okay, the last part of this needs to be done from the ProxMox Web Panel, so login and follow along…
1. Datacenter (on left) –> Storage tab –> Add –> ZFS –> Fill in a name for the ID, Select the ZFS pool we just created (vmpool), leave it for Disk Image, Container for content –> Add
2. Create containers or VMs and now you can use your new ZFS storage location!
Optional – Format and Mount the Logical Volume for Backup Files…
1. Back on the command line, why don’t we go ahead and format that other Logical Volume we setup for backups…
2. Create a directory to mount it to.
3. Mount your new ext4 file system to the directory.
4. Ensure it is mounted with df -hT which returns:
Next you need to update /etc/fstab and make sure your new backup volume gets mounted every time the system boots.
5. Open fstab for editing with VIM:
6. Add the following line to the bottom of your fstab file.
7. Finally, you can hop into the ProxMox console, go to the Datacenter tier, storage tab, add –> directory. Then point to /PVEbackups and you are good to go.
Conclusion:
For any new containers you create and set their storage for the ZFS drive you should be able to now take snapshots AND use the snapshot option for backups. Which should greatly increase your flexibility with backing up and restoring containers on the fly. I had to dig all over (because I am not all that familiar with disk management on Linux and not at all with ZFS…) to throw this together so hopefully it saves you a bit of time.
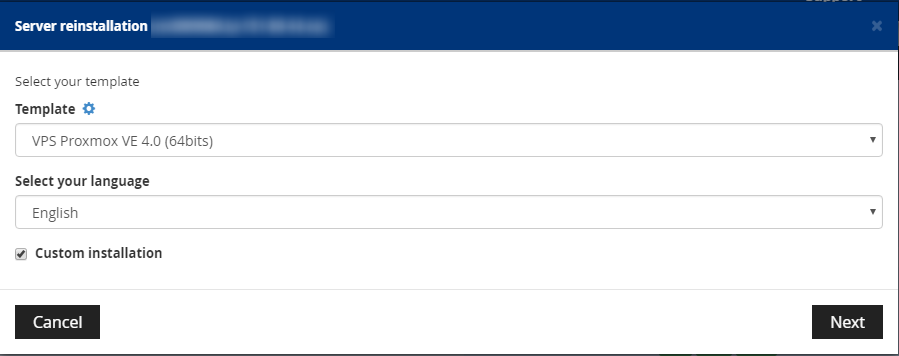
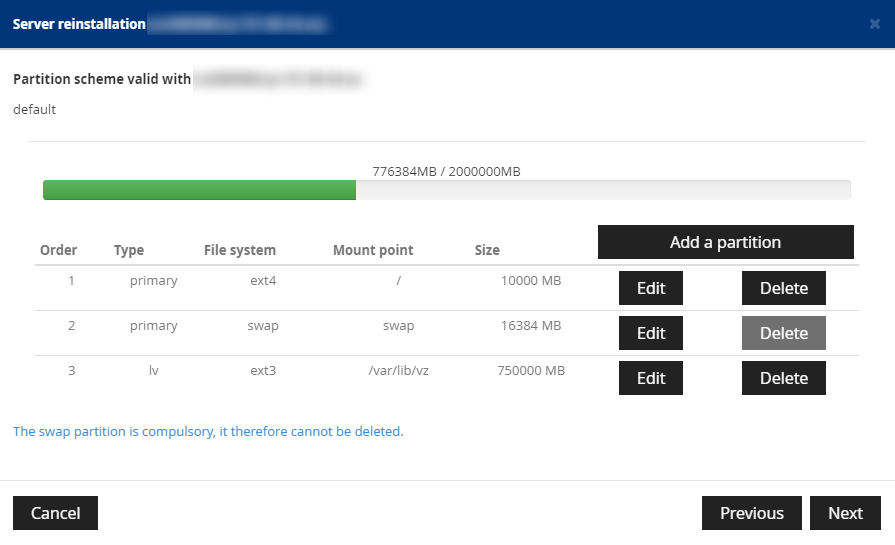
UPDATE 3-31-2016: If you want to save yourself some time and headache and skip the resize portion of this walkthrough (and you don’t mind wiping your server), you can do a custom reinstall of your KimSufi server via their console and resize the data partition there (change from “use remaining space” and instead specify a size). Here are two screenshots:
To further simply things, I decided to just keep my backups on the data volume so I just sized it large (750 Gb) to accommodate that. If you want you could create a second LV here for backups instead but I figure why over-complicate things…
References:
http://linuxdocs.org/HOWTOs/LVM-HOWTO-3.html
http://askubuntu.com/questions/196125/how-can-i-resize-an-lvm-partition-i-e-physical-volume
http://seriousbirder.com/blogs/lvreduce-ext4-example/
http://www.microhowto.info/howto/reduce_the_size_of_an_ext2_ext3_or_ext4_fi…
http://www.howtogeek.com/wp-content/uploads/2011/01/lvm-cheatsheet.png
http://images2015.cnblogs.com/blog/765829/201511/765829-20151129191104547-1706757886.jpg
What is ashift?
Hey nbeam, thanks for your answer in the other post!
This post has 3 month, that say allmost you have 3 month with your server. Tell me about the performance using the ZFS filesystem.
My next server configuration is like yours but have 2 HD x 2TB, I’m thinking in install root and LV partition using ZFS and make a mirror type raid1 with the other harddisk.
Do you have some experience with that? You know if this is possible on OVH panel customizing the partition?
I install Proxmox 4.2 using ZFS root filesystem from Proxmox ISO disk using this guide: https://trick77.com/how-to-set-up-virtual-kvm-vnc-console-ovh-server/